Sunday, April 15, 2012

Apologies

I apologize for not putting up a new post last week, and I will apologize in advance for not putting one up this week. The reasons why include:


  • It's gardening time! I spent this weekend and the last one weeding, shopping for supplies, planting, etc. Since there's a limited timeframe for this, and I'm already late to the party, I had to do it immediately. Normally, I would have shopped earlier in the season and started my seeds from scratch, but this leads to the next entry.

  • I have been under a HUGE amount of stress lately. My work situation had become intolerable, which led me to decide that it was time to quit. Because of several factors, I couldn't start looking for a new job right away - I had to wait a few weeks. And once I did start, job hunting is very time-consuming and stressful.

  • Once I found a new job (which was only two weeks after I started looking), the paperwork for it took three weeks to complete and process, and it all had to be done before I could put in my notice. Meanwhile, I had to keep on dealing with the same awful situation at work without letting on that I was on my way out.

  • Once I did put in my notice, the reason I had decided to quit decided to make my life (more) miserable for the remaining two weeks.

  • I started taking home all the books, plants, and decorations in my office. Since I'd been there for almost five years, that's a lot of stuff. Even taking home a backpack full of books and at least one shopping bag full of stuff a day, it still took the full two weeks, with now-former co-workers helping me on multiple trips the last day. All that stuff has to go somewhere, and it is currently occupying the floor of my sewing room.

  • The project I have been working on in the few spare moments I have is taking much longer than I thought. Two weekend afternoons seemed like it would be plenty - instead, it's taken that and five evenings, and I'm still not even close to done.

  • I stupidly planned an event/secret birthday party for myself next month, and that is taking up my time too.


I start my new job tomorrow, and it make take me a while to et into the swing of things. From prior experience, I am guessing that for the first few weeks, I'll just want to come home and crash. I will try to post outfits of things I've already sewn until life calms down.

Once again, I apologize. It was stupid of me to start the blog the very day I decided to move on. I've been a a bad, bad blogger.

Thursday, April 5, 2012

Coffee Dress: Full Outfit

The fabulous Trystan of This Is CorpGoth suggested I accessorize my coffee dress with red. I rummaged through my closets and jewelry box, digging out things I forgot I had or hadn't worn in a while. Here's the full outfit:


Since the dress is somewhat vintage in style, I wanted to use accessories with the same flair. This hat certainly fits the bill. Whenever I wear it (which is usually to funerals, since this is really too fancy to wear elsewhere), I get loads of compliments. These pictures don't do this hat justice. It's truly elegant and makes me feel like a million bucks (at a funeral - oh how morbid!). It was custom made for me on Etsy by My Treehouse Studio.


The gloves were purchased from Target's Halloween 2011 clearance. Being the cliche that I am, I also bought two pairs of stripe-y tights at the same time (fuchsia/black and orange/black). While I wear the tights frequently and they have held up well in the months since, the same cannot be said for these gloves. The bottom seam fell out and the edge isn't finished, so it started fraying. Unfortunately, I had to take them off shortly after I got to work. It's an easy enough fix, but it's annoying and once again demonstrates the value of hand-crafted items. Wrist-length gloves probably would have been more appropriate here, but I don't have any. YET.

The earrings I've had for forever. I probably got them at Claire's as a tween. While digging through my jewelry, I discovered I have far less red than I though I did most of the vintage stuff is just too fancy. (You know what that means, right? To Etsy to purchase things I don't need!) I went for hoop earrings here, as that's pretty neutral as far as my earrings go.


The fishnets are from We Love Colors. If you haven't shopped there before, you should definitely check them out - 51 colors to chose from in tights, fishnets, thigh highs, etc! They also things like carry dancewear and gloves. And don't feel left out, guys and kiddos, they've got stuff for you too. I know some people - including myself - have had some issues with their sizing, but their wares aren't so expensive that one pair of ill-fitting tights is the end of the world.

I did almost go with solid red tights, but for one, it's just too warm for that here, and two, I thought it might be too much here. The fishnets do have a vintage flair to them that regular opaque tights don't have (IMHO).

While they're a little bit tough to spot, you can see that I'm wearing red barrettes here. These came from Etsy seller Nattie's Place (who seems to have closed up shop). I likely bought them in a lot of 10 or 20.


The shoes are from Famous Footwear and feature wingtip styling.

My hair is about shoulder length (this is after growing it out for a year - it was about nose length before), so there isn't a lot I can with it (not to mention my lack of talent and experience here). While it's difficult to see, I pulled my hair back into a ponytail and then flipped it under and wrapped that in the hair elastic. It looks somewhat like a bun, which my hair isn't long enough for. If there's a name for this style, I don't know about it. Also difficult to tell from this picture (partially because of the lighting and partially because my hair was wet), my hair is actually purple in the front and brown in the back.

As I mentioned previously, I did have issues with the sleeves of this dress. I did not like how they turned out and they won't stay where they were supposed to. I had to yank them all the way up to my shoulders, which is not how the dress is meant to be worn. While it looks okay that way, the slightest movement sends the sleeves cascading down my arms. I am definitely going to have to do something about it, which means ripping apart the dress I just finished. Harumph.

I apologize for my bra straps showing. I didn't realize that until it was too late. A strapless bra would probably be the way to go with this dress (especially if the sleeves actually would sit where they are supposed to). Lesson learned.

Cost breakdown:
Shoes: under $50 from Famous Footwear
Gloves: under $10 from Target
Fishnets: $9 from We Love Colors
Barrettes: ~$2 from Etsy seller Nattie's Place
Hat: $55 from Etsy seller My Treehouse Studio
Dress: ~2.5 yds of Lucy's Crowd Coffee Cups @ $7.21/yd (but I had $20 coupon!) from Fabric.com

Thanks to my dear husband for taking the pictures.

Monday, April 2, 2012

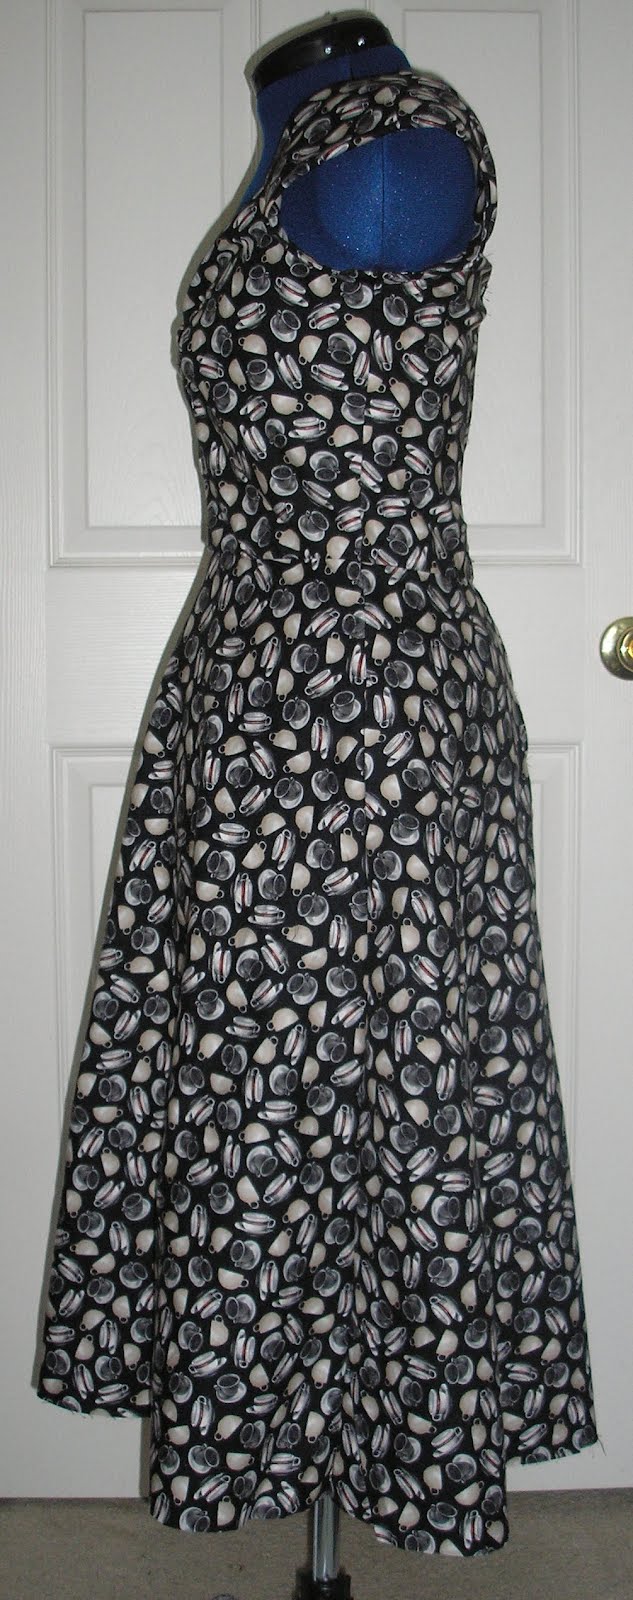
Coffee Dress

I mentioned this pattern previously. I made view A, 'cause I loved the sleeves.

I was going to go with a Halloween print, but ended up picking a coffee print instead. Think it'll look perky? Ha ha ha! Ha! Anyway, I found out after the fact that this is actually an I Love Lucy print. That doesn't really matter, but I thought I'd mention it.


Most of the construction of this dress is pretty straightforward, except the sleeves. There's some gathering in the bust, but that's nothing too big. Here's the bodice:


Rather than go over every little detail of the sewing and then showing the final product, I'm going to show the final product and then go back to the details. This was another dress where it needs to hang (overnight, not 24 hours!) to stretch before it's hemmed. I was impatient, so I went ahead and took pictures of the unhemmed dress.


Here's a close up of the gathering:


NB: those sleeves don't really look anything like the pattern envelope. I could tell as I was sewing them that they weren't going to work; the elastic was just too long and inserted in a stupid way. They're supposed to hang off the sides, but the only way the dress will stay up is if I pull them all the way up like I've done here. I'm not sure if I'm going to keep it that way or try to fix it yet, but I was pretty disappointed by how this turned out.

I will probably go back and make the bolero featured in this pattern at some later date. If I do anything to the sleeves, I will do a post on that also.

Other than the sleeves, this is a pretty easy pattern. The gathering aside (which isn't even in all the views), the only other challenges would be inserting the zipper and the understitching. While I haven't tried the other views, I would say going with either the straps or the sleeves of view C would be the way to go here. A beginner could probably handle this pattern.

Wednesday, March 28, 2012

Fabric Paint & Stencils

Anyone out there with experience using fabric paint with a stencil? I've done it before (after all, I was a Girl Scout for six years), but not in a long time. Also, I'm pretty sure that was on a t shirt. What I have in mind this time is using plain quilting cotton.

Damn, it's both wonderful and awful when I get these ideas in my head, and they have to be done now, now, NOW!

Tuesday, March 27, 2012

Skittles Dress II

Last time, I left you lamenting over how I couldn't eat Skittles (I checked - the recipe has changed and Skittles no longer uses gelatin, though Starburst still does) and with a convoluted tale of how I chose the fabric for Butterick 4790. I stated, off-handedly, that the sewing of the dress would probably end up being shorter. Oh boy, when will I learn not to open my big mouth?

First up: since I was making the dress in view A, I needed a fabric for contrast. Plain black wouldn't have worked here, I thought. It seemed too stark. I did have a matching pink (JoAnn's calls it flamingo), leftover from a Daisy-Head Maizy costume I made for a coworker. Apparently it makes a comfy cat bed.


Butterick rates this pattern as "very easy". Erm. I would say it's "very easy" for someone who already knows how to sew. The first step is inserting darts in the front and back, with no instructions other than "sew in darts". This is the front:


I've seen fewer lines on a road map. Note that the lower dart actually meets up with the bust dart! Sure, since I can put in darts with my eyes closed, this wasn't a big deal to me, but this alone would probably bump a pattern from the "very easy" category. Harumph #1.

Because the skirt of the dress is cut on the bias, this dress has to hang a while to stretch out. The instructions say 24 hours, which I found weird. Usually they say overnight or eight hours, but whatever. This style of is called a walkaway dress because you can sew it quickly in the morning and walk away wearing it that night. Doesn't seem possible if you have to hang it for 24 hours.

The next few steps involve putting darts in the back, joining the back and front, and then hemming the skirt. If you can handle the darts from the first step, this should be no problem. However, the next step involves bias tape. I won't treat you to my rant on bias tape, but I will suffice it to say that I made my own (as I always do) out of the leftover fabric from the front. The instructions at this point are "enclose the seam in bias tape" - er, what? Again, I am experienced at this, but for "very easy" I would have expected more. I have several Simplicity patterns of a higher difficulty rating that feature step by step instructions on using bias tape. Harumph #2.


After the bias tape is applied, sewing on the closure is the final step. The pattern states to use sew-on snaps (overlapping the front) and then make a loop for buttons out of bias tape. I did not like the look of the overlapping front. It added bulk to the waist and just looked sloppy. Also, I don't trust stretchy bias tape with two buttons to keep a dress closed. I decided I would have the bias taped edges just meet in the middle and use actual buttons with buttonholes for the closure. I toyed with sewing a flap to the inside edge, sewing buttons to that, and flipping it over (does that make sense to anyone but me?), but in the end, I sewed the buttons to the actual inner front (the pink part) and the buttonholes in the outer dotty fabric. That should also ensure that the dress doesn't slip around too much.


The color combination reminds me of watermelon. I flipped the front around, buttoned it, and then added a hook and eye to ensure the dress doesn't pull too much at the buttonholes.


Here's the back and side:


Looks cute, right? I showed it to my husband and he said "wow, that's a lot of pink!" This from a guy who is always trying to get me to wear more color (to which I say: "I wear exactly as much color as I want to"). This was immediately followed with "hey, your bra is showing through!" - I guess I'm either going to have to get a beige color bra (ugh), line the dress (ugh ugh), or wear a slip (ugh ugh ugh). Harumph #3 (though this one is my fault).

I twirled around a little to make sure the fit was good and immediately noticed a problem. Scroll up to the picture of just the front with the buttons; the back of the sheath isn't sewn to itself or anything, and the only thing keeping the back of the dress in place is static cling. When I wore it, the sides immediately fell down to the level of the buttons, exposing my bra and ribs. A quick fix was a small piece of elastic and some Velcro, but sheesh. This dress would be utterly unwearable if it was constructed according to the directions.

So, it comes down to this: though Butterick might rate this pattern "very easy", if you don't already know how to sew in darts and enclose seams in bias tape, I would shy away from this one if you're just starting. If you're not comfortable with making major modifications to make a garment wearable, steer clear. Simplicity has a better collection of learning to sew patterns.

One more thing, regarding the waist: since this is going to be tight around your waist, double check your measurements! I saw a lot of people whining about how there must be something wrong with the pattern to gap or overlap in the front so - nope, you either sewed it wrong, cut the incorrect size, or you aren't the size you think you are. A lot of people measure once and then don't bother doing it again after significant weight loss or gain, and then bemoan how sizing on their patterns are wrong. Listen, if your purchased garments don't fit after weight change, why would sewn garments? Harumph #4.

Friday, March 23, 2012

McCall's Summer 2012

As the sewing nerd that I am, it should come as no surprise that I am on the mailing list for McCall's patterns (as well as Butterick, Vogue, New Look, and Simplicity). This morning, they released their summer 2012 collection. They've got some cool new patterns, including this dress and this swim suit - but what I liked the most was this dress in view E. Too bad it's in child sizes. Though I do occasionally wear a youth large or extra large t shirt, I'm not sure I could wear something that doesn't have some stretch. I wonder if I could alter the largest child size to fit me. Hmm...

Monday, March 19, 2012

Skittles Dress I

Our story begins with Butterick 4790. It's a reprint of a pattern designed in 1952 with modern sizing. I go in and out of vintage phases, and was in one when I bought this pattern. I was itching to make it as soon as I could, but I was in the middle of other projects that I couldn't stop. Around the same time, fabric.com (one of my fave fabric sites) had this fabric on sale:


That's Geeks Gone Wild's Pac-Man fabric. I had to have it! Had to! I just needed to decide which pattern I would use it for and then buy the appropriate yardage. I remembered that pattern and thought it would be perfect. The incongruity of a 50s dress meeting 80s pop culture was too good to pass up. I even had some mega-cute Ms. Pac-Man buttons made for me on Etsy. I was ready and raring to go, all I needed was the time to make the dress!

Well, my projects all finished up (after months, harumph), and I finally was back to sewing for myself. I kept going to that pattern and fabric and then shying away from it. Something was making me hesitate. Was it the humor of a 50s/80s matchup wearing thin? Was it the thought of trying to explain the humor daunting? Concern over how the fabric would look cut on the bias? I think what finally changed my mind was those damn buttons. They're made of polymer clay and probably shouldn't be put through the washing machine. Even washing the dress by hand would be a risky prospect. I began thinking of ways to make the buttons removable without having to re-sew them whenever I wore the dress (such as sewing the buttons to snaps, sewing them to a Velcro strip, etc.). Ultimately, I decided that if I had doubts about such awesome fabric, then this probably wasn't the pattern to go with. You can always re-use the pattern, but you can't re-use the fabric.

So with that idea shelved, there was the question of what fabric I should make the dress in. It just so happens that I had McCall's 6024 and fabric already purchased - AND both patterns used the same amount! I'm going to take this as kismet and sew the Butterick pattern in the second fabric. I can't find the fabric on the Joann's site, but it's black with lavender, pink, yellow, and green dots - which is why it reminds me of Skittles.

I can't eat Skittles because they have gelatin. (Or at least they used to. I haven't checked in a while.)

I also know regular Skittles don't have a pink flavor and the purple is dark, rather than light. But Skittles were the first thing that popped in my head, so that's what I'm sticking with.

So next time, I'll feature the actual sewing of the dress. I imagine that post will be shorter than this one.