Wednesday, December 26, 2012

Bag of Tricks

Remember the contest I held for Halloween?  Erm.  Well, my personal life kind of hit the fan (and is still actively hitting the fan, but that's a story for another day) and there was a huge delay in getting the prizes made (apologies once again to C Girl and Melody Brown).  Well, I have learned my lesson; if I do this again next year (which I plan to), I will either buy prizes or have them made before the contest ends.

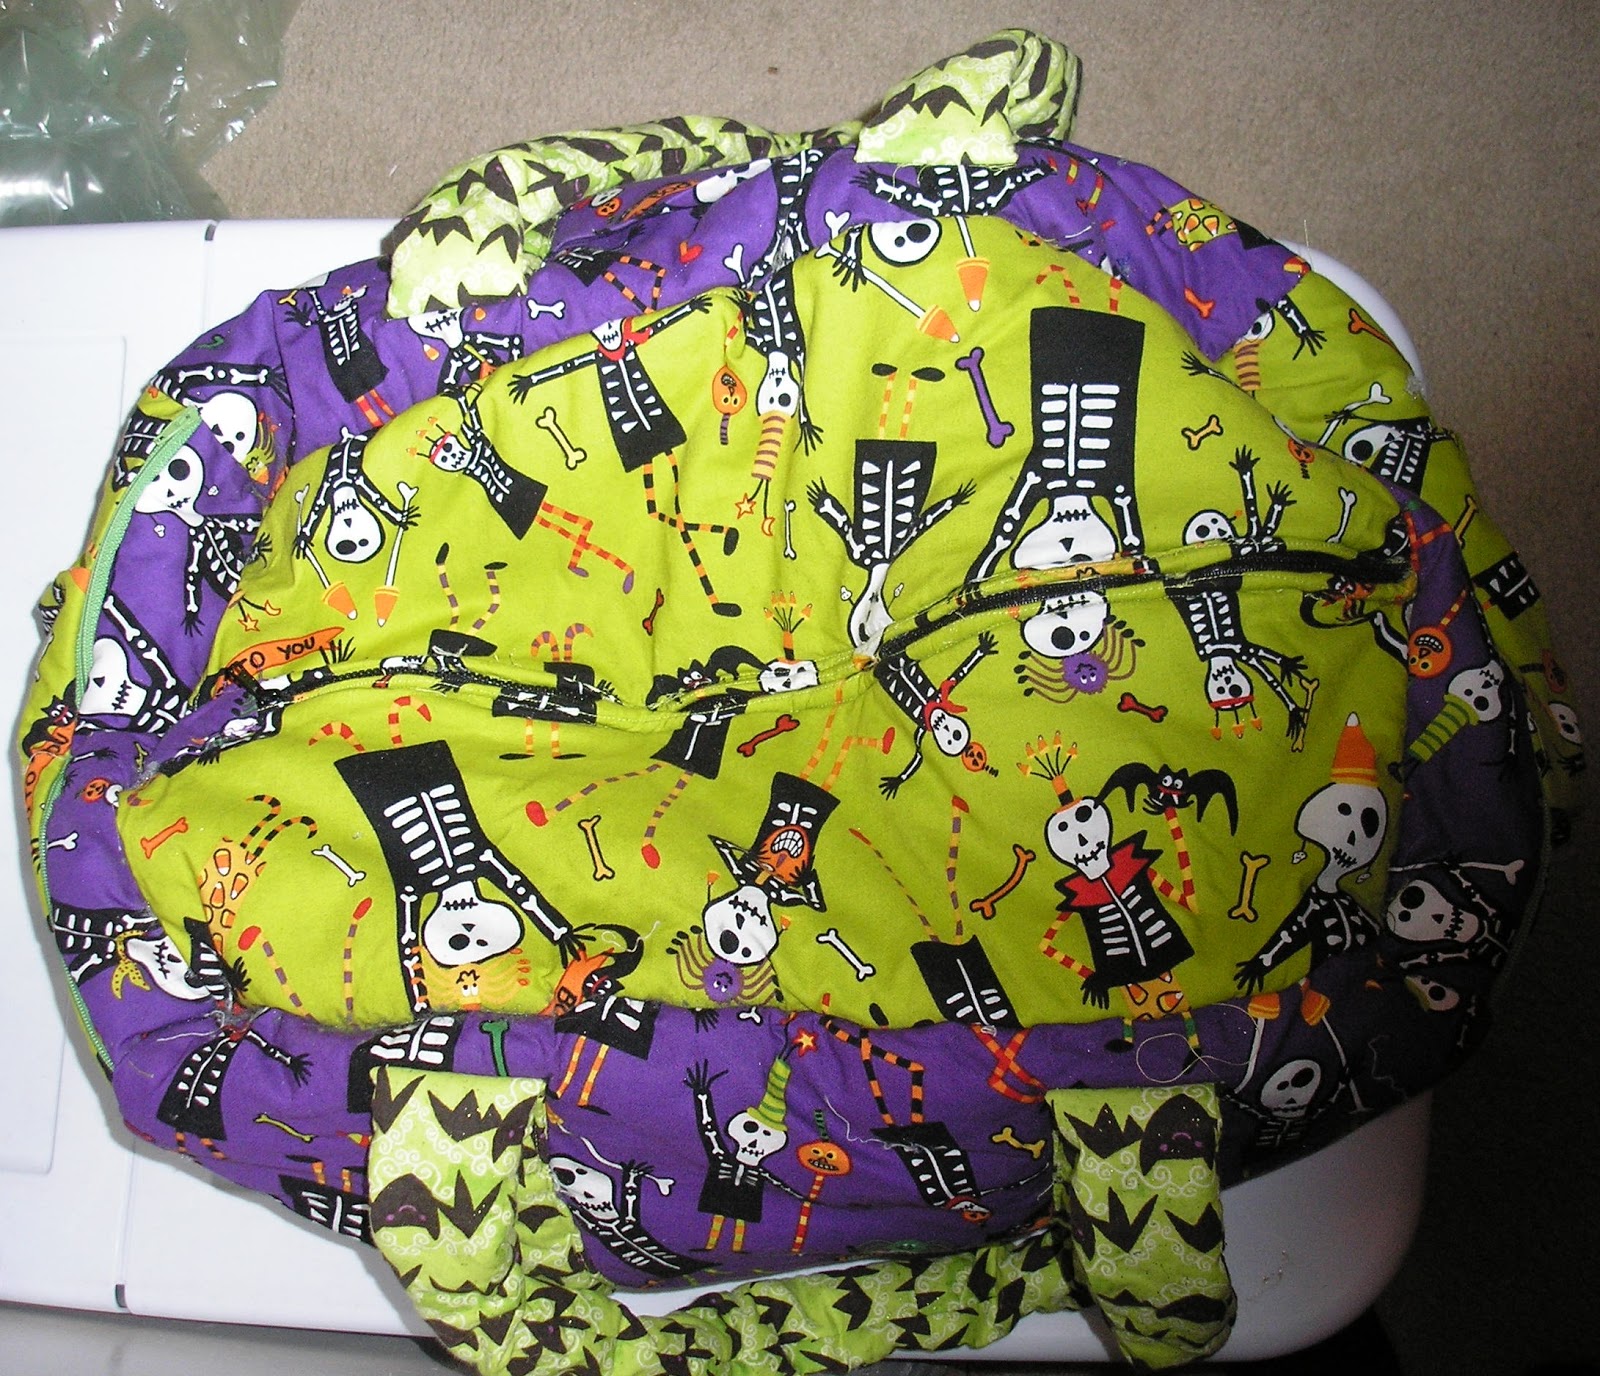
Top view
Anyway.  This is the first prize, which C Girl won for being the first person to answer correctly.  Simplicity 2274 features an overnight bag, clutch, and luggage tag.  C Girl's prize was the overnight bag.

I had Dem Bones by Carol Elridge (in green and purple) sitting around in my stash, waiting for a project perfect for it.  C Girl and I thought this would do quite nicely; we planned on purple for the outside and green for the lining.  I laid out the pattern on the fabric and... I discovered I did not have enough.  I tried all the twists and tricks I know, but I could not get the pattern to squeeze into the smaller fabric without separating the pattern pieces.  The main body (top, long sides and bottom) is all supposed to be one piece.  I split that one piece into a top, sides, and a bottom.  I then did all the sides in purple and the top and bottom in green.  The front pocket is in purple and the side pockets (the pattern called for one, but I did two) is in green.  I found a fun, sparkly bat print at JoAnn's that mostly matched and used that for the lining and handles.

Side view with zippered pocket
Standard garment zippers were called for in this pattern.  While I did use those for the side pockets, I am always antsy about using those flimsy things for something that is opened frequently and takes a lot of stress.  So for the main zipper, I used a separating one instead, and just stitched the end together so it couldn't open all the way.  I couldn't find one in purple, so I went with classic black.

To give the bag shape, the pattern calls for quilt batting.  That's all well and good, but there was no interfacing at all in this pattern.  I reinforced the bottom anyway; I've made bags like this in the past, and it is utterly necessary.

Side view, sagging disturbingly
Speaking of bags that I have made in the past, I have noticed a trend for patterns to call for exposed seams on the inside.  (You sandwich the batting between the outer fabric and the lining.)  The instructions generously "allow" you to finish those seams if you choose.  Pfft.  An example of this is Simplicity 2713 (out of print - get it while you can), a diaper bag.  (An aside: I have made this pattern four times, and only once was it for a diaper bag.  That was the first time, for my new-born nephew in a Beatrix Potter print.  The second was for my now-deceased grandmother in a lavender rose print to use for her knitting.  The third was for my mother, in a print called "Caffeinated Kitties"; it holds her needlework.  Lastly, I made one for me in a spider print.  This holds my much-neglected crochet.)


Returning from my wild tangent about diaper bags, I have gone ahead and left exposed seams if it was something I was making for myself and in a hurry, I would never do that for someone else.  So with those aforementioned diaper bags and this overnight bag, I sewed the batting to the outer fabric and sewed the lining separately.  You have to be careful when sewing batting, because it likes to get caught in the feed dogs and presser foot.  To join the lining to the outer part, I sewed the seams together on the inside.  I had to leave an open seam - I picked one at the top that had to be hand-stitched closed, but it was in the lining and didn't show.

So, is it fair to call this a pattern review?  I only kind of used the pattern and only kind of used the instructions.  If I had followed the instructions and had enough fabric, the project would have been much easier, but I couldn't stand for those exposed seams.  If that doesn't bother you, then the only bit that's difficult is the side pockets.  Due to the way the zipper is installed and the pleats, It's trickier to do than it appears.  Machines with weak motors might have some difficulty getting through the layers of batting.  So if your machine is strong enough and you don't mind exposed seams, then this is a good pattern for a beginner.  If the seams bother you, then I would bump the difficulty level up to advanced beginner or intermediate.


Monday, December 17, 2012

Here Today, Gown Tomorrow


The status report for this month is Holidays in the Office.  While there was a party in the office, I was not able to get a shot of my outfit (it was pretty awesome though: black pencil skirt, black tuxedo blouse, skull tights, skull suspenders, Victorian-inspired shoes, derby hat, skull jewelry).  This is the gown I wore to my company's holiday party.  It was at a super fancy resort and lasted the whole weekend.  I apologize for the quality of these pictures; despite the fanciness of the place, the lighting in our room was absolutely terrible.  Only the bathroom had bright enough light, so please ignore the towels in the background.  Also, we had left the camera at home, and these were taken with my cell phone.

Anyway, onto the review.  The pattern is New Look 6454, in a combination of A (the halter) and C (the godet).  Strapless dresses don't work on me because I don't have the proper assets to keep them up, and I don't particularly care for those super skinny spaghetti straps.  The back was too low to wear a regular bra, so I am wearing one of those adhesive ones.  I can't remember why I chose the gore instead of the fuller skirt of view A; perhaps because those little godets would look silly in a contrasting color?

 I made this to wear almost two years ago to my birthday party.  It was a Clue (Cluedo for non-North American folks) party; or rather, it was intended to be, but folks didn't really play ball as much as I would have liked.  I made a character up for myself that was a baroness, so I needed a fancy dress.  The fabric I used was crepe-back satin.  The party was in June (though my birthday is not in June; it's a long story how that happened).  June in the greater DC area is hot.  While I was stuck with synthetic fabrics for the dress, I opted against lining the whole thing (I don't think a lining is necessary for the whole dress unless you opted for a super-light crepe), I lined the bodice in cotton.  I figured that would mitigate a bit of the problem the synthetic would cause, and it did.  Other changes I made: I skipped boning and lace overlay.  I don't need the support of boning and it's a pain in the ass anyway (both to sew it and wear it).

One note here: this has a side zipper, so southpaws might want to switch it to the other side.

So how difficult was this?  I remember it as being time-consuming, but not difficult.  Perhaps it was time-consuming because I was planning the party at the same time?  The bodice construction wasn't any more difficult than any other dress with similar lines.  Satin is a pain to sew because it loves to fray (so you really should finish all the edges, and I do) and likes to slip against itself.  Cutting can be a bit difficult if your scissors aren't sharp enough too.  So if you can triumph over the challenges of satin, then the actual sewing isn't too bad at all.  Just remember to keep your grain straight when cutting; that seems to be an issue with me for satin more than any other fabric, and it probably due to the slipping I mentioned already.  So overall difficulty assessment leads me to recommend this for an advanced beginner.

The wrap did not have clear instructions for cutting and sewing.  It's just two rectangles on each side, so how hard could it be?  Well, the copy of the pattern I have gives a length of rectangle to cut, and the instructions simply state to "sew the ends together" without specifying which ends.  I was pretty annoyed at that.

My accessories:

  • Purple tights from welovecolors.com
  • Gloves from Good Goth
  • Choker from Etsy
  • Earrings from Charming Charlie, Claire's, and Good Goth (going from the bottom up)
  • Bracelet from Charming Charlie
  • Satin flowers made by me from a tutorial that I can't seem to find again.  I also had a wrist corsage that I didn't wear and a large one in both black and purple to hold the wrap.
  • Nose ring from Pierced Fish in purple
PS: Theora turns six today. Please join me in wishing her a happy birthday.  She will return your wishes by waking up from her nap, yawning, rolling over, and taking another nap.

Thursday, December 13, 2012

McCall Spring Collection

McCall has just released their spring collection for 2013.  There's nothing too exciting here, but they seem to have gone a bit nuts with the bicycles.

Wednesday, December 5, 2012

Jareth IV: Accessories

For the last post in the Jareth saga, I wanted to cover the items that I did not sew.

  • Wig; I can't remember where I bought the wig from, nor can I find a record of purchasing it.  But here's the exact wig for sale somewhere else.  The style was called Long Rocker Mixed Blond.  It was a little lighter than I would have liked, but was quite nice for the price.
  • Scrying ball: purchased from sage-woman on eBay.
  • Leggings: my mother bought these for me when I was a teenager for a SCA event.  I'm not really a leggings person, but I'm also a packrat, so they've been sitting in the back of my various closets since.
  • Boots: I acquired these when I was in grad school; they're from Journey's.  They were the last pair on the clearance rack, they were my size, and they were $5.  It was fate.
  • Gloves: from Spirit.  Wicked cheap.  You get what you pay for.
  • Eyeshadow: I don't wear makeup on a day-to-day basis; only for Halloween, weddings, or company holiday parties.  It shows.  I got this from SobeBotanicals on Etsy.

Wednesday, November 21, 2012

Jareth III: Vest

The last component I made for the costume was the vest.  This was the hardest pattern to select.  Since Jareth never takes off his coat in the scene, I am not even sure that it is a vest.  In fact, it looks like some kind of waist-cincher.  I looked at several under- and over-bust bustiers/corsets.  I decided against them because I thought it would make my figure look too feminine and even cross-dressing as David Bowie is still cross-dressing.  Plus, I was going to be wearing this to work and that it might be construed as too sexual (though since I no longer work in an office full of pervs, it probably would not be a problem, but I didn't want to take that chance).  I then started looking at vests, and thought Simplicity 3629 would be nice because it covers the hips.

I picked a beautiful brocade and lined it with the same satin I used for the blouse.

The coat ended up taking me longer than I thought it would, which left me with one weekend in which to make this garment.  My thoughts were "It's just a vest, so how hard can it be?"  When will I learn not to open my big mouth?

I made the mistake of not reading the instructions before I set out on this travail.  First off, this isn't really a vest: this isn't open in the front and the buttons are just for show.  It actually zips up the back, which I think would make this qualify as a sleeveless top or a bodice.  Anyway, I was strongly considering transforming it so that it was split up the front, but being pressed for time, I decided against that.  I figured I might as well omit the buttons and the pocket flaps too.  (I desist faux pockets.  Do it right or don't do it at all.)

Let me note here that this pattern is meant for beginning sewists: seams are not trimmed or clipped, there is no call for under-stitching, and the way the straps are attached calls for the seam to be exposed. Pressed for time or not, I was going to have none of that.  It made more work for me, but I felt that would look better in the end.  I nearly finished the garment that Saturday, leaving me to just under-stitch and insert the zipper on Sunday.

The under-stitching only took fifteen minutes.  The zipper is a little weird here: it zips from the top down, but it actually runs the whole length of the garment.  A separating zipper would have made more sense, and should have been going bottom up.  But as I said, I was not going to deviate because I just wanted to get the damn thing finished.

After inserting the zipper, I tried it on an...  It got a couple of inches and stuck.  This is quite unusual because I am bottom-heavy; it is far more likely for something to be tight on my tips and loose on the upper body.  I ripped out the zipper and tried again, stitching just on the edge of the zipper tape.  No go.  So I tried again, doing the zipper as a bottom up.  Still didn't work.

It had become obvious that I was going to need more fabric in the back.  The vest was ludicrously loose on the hips, so I didn't need more fabric there, and was fine through the shoulders.  It was just the ribs that needed help.  I played around with inserting fabric just into the small area that needed more room, but I couldn't get the zipper to lay flat through it.  I bifurcated the piece because I figured it would only lay nicely if it was exactly in the middle.  I was right, but now the back was too small again.

At this point, I was just about ready to give up.  I had been working on this stupid vest all day and was frustrated beyond belief, as well as tired and hungry.  It seemed the only was I was going to get this to work was splitting the vest up the front and making it faux double-breasted.  I didn't want to do that because I liked how the lines laid, but it didn't seem like I had any other choice.

I had the scissors ready to split it up the front when something occurred to me: Jareth never takes off his coat, so this wasn't necessarily a waist-cincher or a vest.  It could be a cummerbund, a big fancy belt, or even part of his shirt.  I had already deviated by bringing it down to my hips, so being perfectly accurate was already out.  Jareth wears a corset vest earlier in the movie, so why not just do that?

Running on adrenaline, I dug through my notions stash to see what I had.  The proper way to do this would have been with boning and the grommet gun.  I wasn't planning on tight-lacing, so I could skip the boning, and I had already had enough frustration for the day that the thought of facing the grommet gun nearly brought me to tears.  However, I found a large amount of grommet tape nestled among my ribbons and trims.  I honestly have no idea where this came from or why I had it.  I have used grommet tape before, but it was always on faux leather and this was on grosgrain ribbon.  I can only surmise that I saw this on sale and figured it would a nice addition to my stash.  Regardless of the reason, I am grateful I had it, because it truly saved the day here.

Bleary-eyed, I grabbed the longest ribbon in the stash (a metallic silver which would have been quite nice if I hadn't been wearing a silver-grey blouse under this) and laced it up.  Well, wearing it backwards, I laced it up.  I just had to make sure it would close over my ribs and look okay.  I got to the waist, said it was good enough, and threw it in the wash.  I bought some contrasting blue (to match the coat), but never had a chance to lace it up entirely until the day of the party, wherein I discovered the ease on the hips was even more ridiculous than I remembered.  I grabbed some safety pins, taking EIGHT INCHES off the hips; you can see this in the pictures where the side seam looks a bit lumpy.  Even so, it is still laced right to grommets there.  I can only surmise it is because this is to be worn over a skirt, but it still seems excessive.

After the party, I took a bunch of that ease out, as well as edge-stitching the vest (like the coat, it did not want to lay flat).

So, would I recommend this?  If you even think that your rib cage might be wider than is typical, or you have a broad back, I would say no.  If you do, make a muslin first.

After wearing this to work on Halloween, a co-worker asked me to make her one too, so I will be facing this crappy pattern again.


Thursday, November 15, 2012

Fleece Navidad


The theme of this month's This Is CorpGoth status report is What Do You Wear to Work in the Winter?   Every place I have worked, less one, has always been freezing cold.  So I'm going to cheat a little bit here, because this is something I wear year-round in the office.

McCall's 5538, view C, is the guilty party.  I chose this version because it had the full-length separating zipper, which made it easier to remove during work.  The only alteration I made was omitting the arm pocket.  The fleece I got on clearance from JoAnn's for ridiculously cheap - something like $1.50/yd.  It's snuggly and soft.

If you haven't sewn fleece before, it's a bit tricky.  Unlike cotton or satin, you don't need to finish the seams, but it is much thicker and sheds fuzz.  These lead to wearing out needles faster and clogging up the machine.  I've had cheap machines that could not get through multiple layers of fleece.  It's not a difficult fabric to work with, such as velvet is and always will be, but it can have a bit of a learning curve.  If this is your first experience with fleece, it might be wise to do some stitching tests on swatches first.

Because this pattern has options for contrast, there are more pieces to this pattern than you'd expect.  I don't think the yoke front adds too much if you don't use the contrast, especially if you have patterned fabric like I did.  I suppose it wouldn't be too much work to alter the pattern so the yoke is omitted, if you chose, but it didn't bother me enough to put forth that sort of effort.

The other feature that I like so much about this pattern (other than the full-length separating zipper) is the pockets.  My old office was so cold that I used to carry gloves around with me in one pocket and hankies in the other.  I sometimes carried around my MP3 player and snacks too.  Never underestimate the power of functional pockets.

Because this is a jacket and is meant to be worn over other clothing, this is pretty loose.  I did go up a size, in case I wore a bulky sweatshirt or something or the sort, and if I made this again, I would still do the same.  Another alteration I would make is adding elastic to the cuffs, and perhaps the bottom hem.

The zipper this pattern calls for is 30 inches, which is several inches too long for the size I made.  I found that quite odd, so you might want to sew the majority of the jacket, measure, and then purchase a zipper accordingly.  I imagine the length difference would matter less in one of the larger sizes.

Overall rating: though I have several fleece jackets I rotate though at work, this one is my favorite.  I have some pumpkin fleece sitting in my stash that is waiting to be sewn into another version of this.  So if you don't have any problems sewing fleece, this pattern can be tackled by a beginner.


Wednesday, November 14, 2012

Jareth II: Coat

There were more choices when it came for me to select a coat pattern.  I couldn't quite find one that had all the elements I needed, so I pulled a Dr Frankenstein and combined two to get what I needed.  The bulk of the pattern came from Simplicity 2172.

The first problem was that this pattern did not have tails.  This is an easy fix: just don't sew the back seam up all the way.  The second problem was the chiffon cuffs and collar.  It was easy enough to replace the chiffon at the cuffs with satin ones, but for the collar, I used Simplicity 3685 (view A).  This was also my source for the lapels.  And I lengthened the sleeves again.

This coat pattern actually has a corset-type lacing in the back which I quite fancied, but omitted.

I don't care for shoulder pads (which Jareth's coat obviously has), so I left in the flounces to give some additional width.

Finding a fabric for this pattern was tough.  Jareth's coat is covered with rhinestones which probably number into the hundreds.  Sewing on that many rhinestones was not something I wanted to tackle.  I was hoping I could find a pre-sequined fabric and go from there, but most of them were either sheer, stretchy, too expensive, or some combination thereof.  I went with glitter satin from the Casa Collection.  It photographs quite poorly; really, you can only see the glitter well in the close-up on the black satin.  This blue wasn't really as dark as I would have liked, but it was the best I was going to get.  I sewed on the sequins by hand.  I actually intended to sew on more than I did, but I got tired of the whole endeavor.  The lining was the same satin I used for the blouse.

There isn't anything too quirky about the construction of this coat except that it is quite lengthy, though the instructions are pretty good.  The amount of fabric is nearly overwhelming, so take care when cutting that the fabric doesn't pull and distort the grain.  This satin did not press well, so I ended up edge-stitching it to keep flat.  Due to the lengthiness of construction, I would recommend this for an intermediate or advanced beginner.

This coat is fitted around the waist, so double-check your measurements.

NB: if you are not using a heavy fabric, you might want to interface the coat.  The only interfaced part is the facings.