Anyone out there with experience using fabric paint with a stencil? I've done it before (after all, I was a Girl Scout for six years), but not in a long time. Also, I'm pretty sure that was on a t shirt. What I have in mind this time is using plain quilting cotton.
Damn, it's both wonderful and awful when I get these ideas in my head, and they have to be done now, now, NOW!
Wednesday, March 28, 2012
Tuesday, March 27, 2012
Skittles Dress II
Last time, I left you lamenting over how I couldn't eat Skittles (I checked - the recipe has changed and Skittles no longer uses gelatin, though Starburst still does) and with a convoluted tale of how I chose the fabric for Butterick 4790. I stated, off-handedly, that the sewing of the dress would probably end up being shorter. Oh boy, when will I learn not to open my big mouth?
First up: since I was making the dress in view A, I needed a fabric for contrast. Plain black wouldn't have worked here, I thought. It seemed too stark. I did have a matching pink (JoAnn's calls it flamingo), leftover from a Daisy-Head Maizy costume I made for a coworker. Apparently it makes a comfy cat bed.

Butterick rates this pattern as "very easy". Erm. I would say it's "very easy" for someone who already knows how to sew. The first step is inserting darts in the front and back, with no instructions other than "sew in darts". This is the front:

I've seen fewer lines on a road map. Note that the lower dart actually meets up with the bust dart! Sure, since I can put in darts with my eyes closed, this wasn't a big deal to me, but this alone would probably bump a pattern from the "very easy" category. Harumph #1.
Because the skirt of the dress is cut on the bias, this dress has to hang a while to stretch out. The instructions say 24 hours, which I found weird. Usually they say overnight or eight hours, but whatever. This style of is called a walkaway dress because you can sew it quickly in the morning and walk away wearing it that night. Doesn't seem possible if you have to hang it for 24 hours.
The next few steps involve putting darts in the back, joining the back and front, and then hemming the skirt. If you can handle the darts from the first step, this should be no problem. However, the next step involves bias tape. I won't treat you to my rant on bias tape, but I will suffice it to say that I made my own (as I always do) out of the leftover fabric from the front. The instructions at this point are "enclose the seam in bias tape" - er, what? Again, I am experienced at this, but for "very easy" I would have expected more. I have several Simplicity patterns of a higher difficulty rating that feature step by step instructions on using bias tape. Harumph #2.

After the bias tape is applied, sewing on the closure is the final step. The pattern states to use sew-on snaps (overlapping the front) and then make a loop for buttons out of bias tape. I did not like the look of the overlapping front. It added bulk to the waist and just looked sloppy. Also, I don't trust stretchy bias tape with two buttons to keep a dress closed. I decided I would have the bias taped edges just meet in the middle and use actual buttons with buttonholes for the closure. I toyed with sewing a flap to the inside edge, sewing buttons to that, and flipping it over (does that make sense to anyone but me?), but in the end, I sewed the buttons to the actual inner front (the pink part) and the buttonholes in the outer dotty fabric. That should also ensure that the dress doesn't slip around too much.

The color combination reminds me of watermelon. I flipped the front around, buttoned it, and then added a hook and eye to ensure the dress doesn't pull too much at the buttonholes.


Here's the back and side:


Looks cute, right? I showed it to my husband and he said "wow, that's a lot of pink!" This from a guy who is always trying to get me to wear more color (to which I say: "I wear exactly as much color as I want to"). This was immediately followed with "hey, your bra is showing through!" - I guess I'm either going to have to get a beige color bra (ugh), line the dress (ugh ugh), or wear a slip (ugh ugh ugh). Harumph #3 (though this one is my fault).
I twirled around a little to make sure the fit was good and immediately noticed a problem. Scroll up to the picture of just the front with the buttons; the back of the sheath isn't sewn to itself or anything, and the only thing keeping the back of the dress in place is static cling. When I wore it, the sides immediately fell down to the level of the buttons, exposing my bra and ribs. A quick fix was a small piece of elastic and some Velcro, but sheesh. This dress would be utterly unwearable if it was constructed according to the directions.
So, it comes down to this: though Butterick might rate this pattern "very easy", if you don't already know how to sew in darts and enclose seams in bias tape, I would shy away from this one if you're just starting. If you're not comfortable with making major modifications to make a garment wearable, steer clear. Simplicity has a better collection of learning to sew patterns.
One more thing, regarding the waist: since this is going to be tight around your waist, double check your measurements! I saw a lot of people whining about how there must be something wrong with the pattern to gap or overlap in the front so - nope, you either sewed it wrong, cut the incorrect size, or you aren't the size you think you are. A lot of people measure once and then don't bother doing it again after significant weight loss or gain, and then bemoan how sizing on their patterns are wrong. Listen, if your purchased garments don't fit after weight change, why would sewn garments? Harumph #4.
Friday, March 23, 2012
McCall's Summer 2012
As the sewing nerd that I am, it should come as no surprise that I am on the mailing list for McCall's patterns (as well as Butterick, Vogue, New Look, and Simplicity). This morning, they released their summer 2012 collection. They've got some cool new patterns, including this dress and this swim suit - but what I liked the most was this dress in view E. Too bad it's in child sizes. Though I do occasionally wear a youth large or extra large t shirt, I'm not sure I could wear something that doesn't have some stretch. I wonder if I could alter the largest child size to fit me. Hmm...
Monday, March 19, 2012
Skittles Dress I
Our story begins with Butterick 4790. It's a reprint of a pattern designed in 1952 with modern sizing. I go in and out of vintage phases, and was in one when I bought this pattern. I was itching to make it as soon as I could, but I was in the middle of other projects that I couldn't stop. Around the same time, fabric.com (one of my fave fabric sites) had this fabric on sale:

That's Geeks Gone Wild's Pac-Man fabric. I had to have it! Had to! I just needed to decide which pattern I would use it for and then buy the appropriate yardage. I remembered that pattern and thought it would be perfect. The incongruity of a 50s dress meeting 80s pop culture was too good to pass up. I even had some mega-cute Ms. Pac-Man buttons made for me on Etsy. I was ready and raring to go, all I needed was the time to make the dress!
Well, my projects all finished up (after months, harumph), and I finally was back to sewing for myself. I kept going to that pattern and fabric and then shying away from it. Something was making me hesitate. Was it the humor of a 50s/80s matchup wearing thin? Was it the thought of trying to explain the humor daunting? Concern over how the fabric would look cut on the bias? I think what finally changed my mind was those damn buttons. They're made of polymer clay and probably shouldn't be put through the washing machine. Even washing the dress by hand would be a risky prospect. I began thinking of ways to make the buttons removable without having to re-sew them whenever I wore the dress (such as sewing the buttons to snaps, sewing them to a Velcro strip, etc.). Ultimately, I decided that if I had doubts about such awesome fabric, then this probably wasn't the pattern to go with. You can always re-use the pattern, but you can't re-use the fabric.
So with that idea shelved, there was the question of what fabric I should make the dress in. It just so happens that I had McCall's 6024 and fabric already purchased - AND both patterns used the same amount! I'm going to take this as kismet and sew the Butterick pattern in the second fabric. I can't find the fabric on the Joann's site, but it's black with lavender, pink, yellow, and green dots - which is why it reminds me of Skittles.
I can't eat Skittles because they have gelatin. (Or at least they used to. I haven't checked in a while.)
I also know regular Skittles don't have a pink flavor and the purple is dark, rather than light. But Skittles were the first thing that popped in my head, so that's what I'm sticking with.
So next time, I'll feature the actual sewing of the dress. I imagine that post will be shorter than this one.
Monday, March 12, 2012
Space Invaders III
If you haven't already, you might want to read parts I and II.
The last update on this dress had me considering my contrast options. If you recall, I was pretty confident that I could find a solid aqua or light blue to match the Space Invaders, but had my heart set on some kind of print. My first stop was JoAnn's. Let me first say that I'm not angry, I'm just disappointed. Despite the huge wall of quilting cotton that my local JoAnn's has, they had only one print that even came close to matching - but it was swirly, busy, and just didn't go with the blocky Invaders. So I gave up on that idea and decided I'd just go with a solid. Not my first choice, but eh, no biggie. Well, again, despite the huge selection of quilting cotton, I only found one color match. To refresh your memory, this is what the fabric looks like:
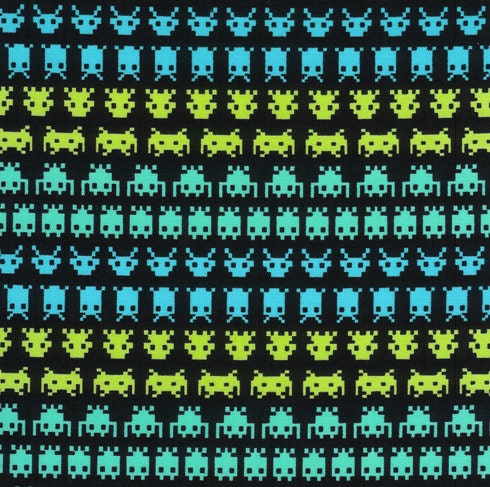
I would have been fine with either aqua or blue, but the only match was in that nasty yellow-green. With no other options, I purchased a minty green - it was in the same color family, but not as dark. I was pretty upset by that I couldn't find anything better - so upset that I went to Hancock's. I really dislike going to my local Hancock's. It's a pretty long story, but I'll just say that it involves rudeness and bad smells. But I figured that for Space Invaders, I could stand it. Their selection was even worse! Nothing even came close. I stared forlornly at the quilting cotton before admitting defeat and heading home.
At that point, my options were to go with the minty green or buy online. Matching colors online is tough without fabric swatches and I didn't really want to waste the time on that. I reluctantly settled on the minty green. The dress is lined and interfaced, so at least I wouldn't have to be concerned about my bra straps showing through.
As of my last update, I had sewn together most of the skirt and part of the top - that was as far as I could get before the contrast came in. Here was the first step in that process:

As you can see, the mint isn't a perfect color match. I grumbled every step of the way about how I was wasting this precious Space Invaders fabric (I'm just gonna say "SI" from now on, okay?), not to mention my precious weekend. Nevertheless, I plunged ahead because I don't like leaving projects unfinished.
My first challenge was the midriff section. The instructions said "sew broken lines together". That's it. It wouldn't have been so bad if there were only two lines, but this is the pattern piece:

I can think of any number of ways one could "sew broken lines together", and even tried experimenting on some scraps, but they all left me with a diminutive midriff piece that was far smaller than the lining piece. It took me longer than I care to admit before I figured out exactly what the instructions were telling me to do. You see where it says "tuck" up there? You sew the lines immediately above and below together, and they don't get sewn to anything else. That does leave an extra line at the top and bottom though, which is why I think I got confused. Those lines are never mentioned, so I think they represent the stitching lines for where the skirt and bodice are attached.
This is the piece pinned:

And here it is sewn:

Sewn to the bodice:

I proceeded with the rest of the pattern, which involved attaching the back, sewing on the skirt, adding the contrast band, and sewing in the zipper. This dress is a bit unusual in that the back is fitted with elastic and the zipper is on the left side (if you're a leftie making this, you might want to move it to the other side). Here's the final dress:


This is how a kitty sulks after you've shooed her off your dress one too many times:

So, overall, this pattern wasn't too difficult, but it was pretty time consuming. Part of the reason for this is that the instructions were very dense - four full pages, not counting the Spanish section. I understand the company has to pay more to get another page of instructions, but "sew broken lines together" is somewhat lacking in clarity. On top of that, I spotted a couple of typos in the instructions and the previously mentioned misprint on the pattern itself. The technical challenges here include: pleating, tucking, gathering, inserting a zipper, and inserting elastic. The last two aren't too bad, but the first three can be. For these reasons, I would recommend this pattern for those of intermediate sewing skills. If Simplicity can correct their typos and expand the instructions, an advanced beginner could probably handle this.
If I made this again, I would make the changes I did before (straps and pockets), but I would also change how the bodice is constructed. I didn't like that it left raw exposed seams. I finished mine, but it wouldn't have been to hard to turn them inside. It grieves me a little to know they're there. :( Also, I was a little disappointed in the length - it hits me about mid-knee, which is a little shorter than I'd like. My fault for not checking the length beforehand, but I would probably lengthen this by two inches, at least. Double check your lengths!
The last update on this dress had me considering my contrast options. If you recall, I was pretty confident that I could find a solid aqua or light blue to match the Space Invaders, but had my heart set on some kind of print. My first stop was JoAnn's. Let me first say that I'm not angry, I'm just disappointed. Despite the huge wall of quilting cotton that my local JoAnn's has, they had only one print that even came close to matching - but it was swirly, busy, and just didn't go with the blocky Invaders. So I gave up on that idea and decided I'd just go with a solid. Not my first choice, but eh, no biggie. Well, again, despite the huge selection of quilting cotton, I only found one color match. To refresh your memory, this is what the fabric looks like:
I would have been fine with either aqua or blue, but the only match was in that nasty yellow-green. With no other options, I purchased a minty green - it was in the same color family, but not as dark. I was pretty upset by that I couldn't find anything better - so upset that I went to Hancock's. I really dislike going to my local Hancock's. It's a pretty long story, but I'll just say that it involves rudeness and bad smells. But I figured that for Space Invaders, I could stand it. Their selection was even worse! Nothing even came close. I stared forlornly at the quilting cotton before admitting defeat and heading home.
At that point, my options were to go with the minty green or buy online. Matching colors online is tough without fabric swatches and I didn't really want to waste the time on that. I reluctantly settled on the minty green. The dress is lined and interfaced, so at least I wouldn't have to be concerned about my bra straps showing through.
As of my last update, I had sewn together most of the skirt and part of the top - that was as far as I could get before the contrast came in. Here was the first step in that process:

As you can see, the mint isn't a perfect color match. I grumbled every step of the way about how I was wasting this precious Space Invaders fabric (I'm just gonna say "SI" from now on, okay?), not to mention my precious weekend. Nevertheless, I plunged ahead because I don't like leaving projects unfinished.
My first challenge was the midriff section. The instructions said "sew broken lines together". That's it. It wouldn't have been so bad if there were only two lines, but this is the pattern piece:

I can think of any number of ways one could "sew broken lines together", and even tried experimenting on some scraps, but they all left me with a diminutive midriff piece that was far smaller than the lining piece. It took me longer than I care to admit before I figured out exactly what the instructions were telling me to do. You see where it says "tuck" up there? You sew the lines immediately above and below together, and they don't get sewn to anything else. That does leave an extra line at the top and bottom though, which is why I think I got confused. Those lines are never mentioned, so I think they represent the stitching lines for where the skirt and bodice are attached.
This is the piece pinned:

And here it is sewn:

Sewn to the bodice:

I proceeded with the rest of the pattern, which involved attaching the back, sewing on the skirt, adding the contrast band, and sewing in the zipper. This dress is a bit unusual in that the back is fitted with elastic and the zipper is on the left side (if you're a leftie making this, you might want to move it to the other side). Here's the final dress:


This is how a kitty sulks after you've shooed her off your dress one too many times:

So, overall, this pattern wasn't too difficult, but it was pretty time consuming. Part of the reason for this is that the instructions were very dense - four full pages, not counting the Spanish section. I understand the company has to pay more to get another page of instructions, but "sew broken lines together" is somewhat lacking in clarity. On top of that, I spotted a couple of typos in the instructions and the previously mentioned misprint on the pattern itself. The technical challenges here include: pleating, tucking, gathering, inserting a zipper, and inserting elastic. The last two aren't too bad, but the first three can be. For these reasons, I would recommend this pattern for those of intermediate sewing skills. If Simplicity can correct their typos and expand the instructions, an advanced beginner could probably handle this.
If I made this again, I would make the changes I did before (straps and pockets), but I would also change how the bodice is constructed. I didn't like that it left raw exposed seams. I finished mine, but it wouldn't have been to hard to turn them inside. It grieves me a little to know they're there. :( Also, I was a little disappointed in the length - it hits me about mid-knee, which is a little shorter than I'd like. My fault for not checking the length beforehand, but I would probably lengthen this by two inches, at least. Double check your lengths!
Friday, March 9, 2012
T Shirt Alteration
T shirts! As an engineer, my basic uniform is jeans and a t shirt. But as a female engineer, there are so many awesome shirts that are cut for a guy instead of a lady. (Though guys can definitely use this tutorial too - a male friend of mine is tall and skinny, so he has to buy larger shirts so they're long enough. I take them in on the sides and it works like gangbusters.) This is a pretty easy project and great for someone who is learning to sew, but you probably don't want to try this for the first time on your vintage The Damned shirt signed by Dave Vanian. (What you should do with that is give it to me so I squeal in a manner unbecoming in someone half my age.)
For this project, you will need:
-a t shirt you like the fit of
-a t shirt to alter
-straight pins
-scissors
-thread
Optional:
-marking pencils
-paper of some short
-pen, pencil, or a marker
-a Siamese cat that sits on everything you attempt to sew
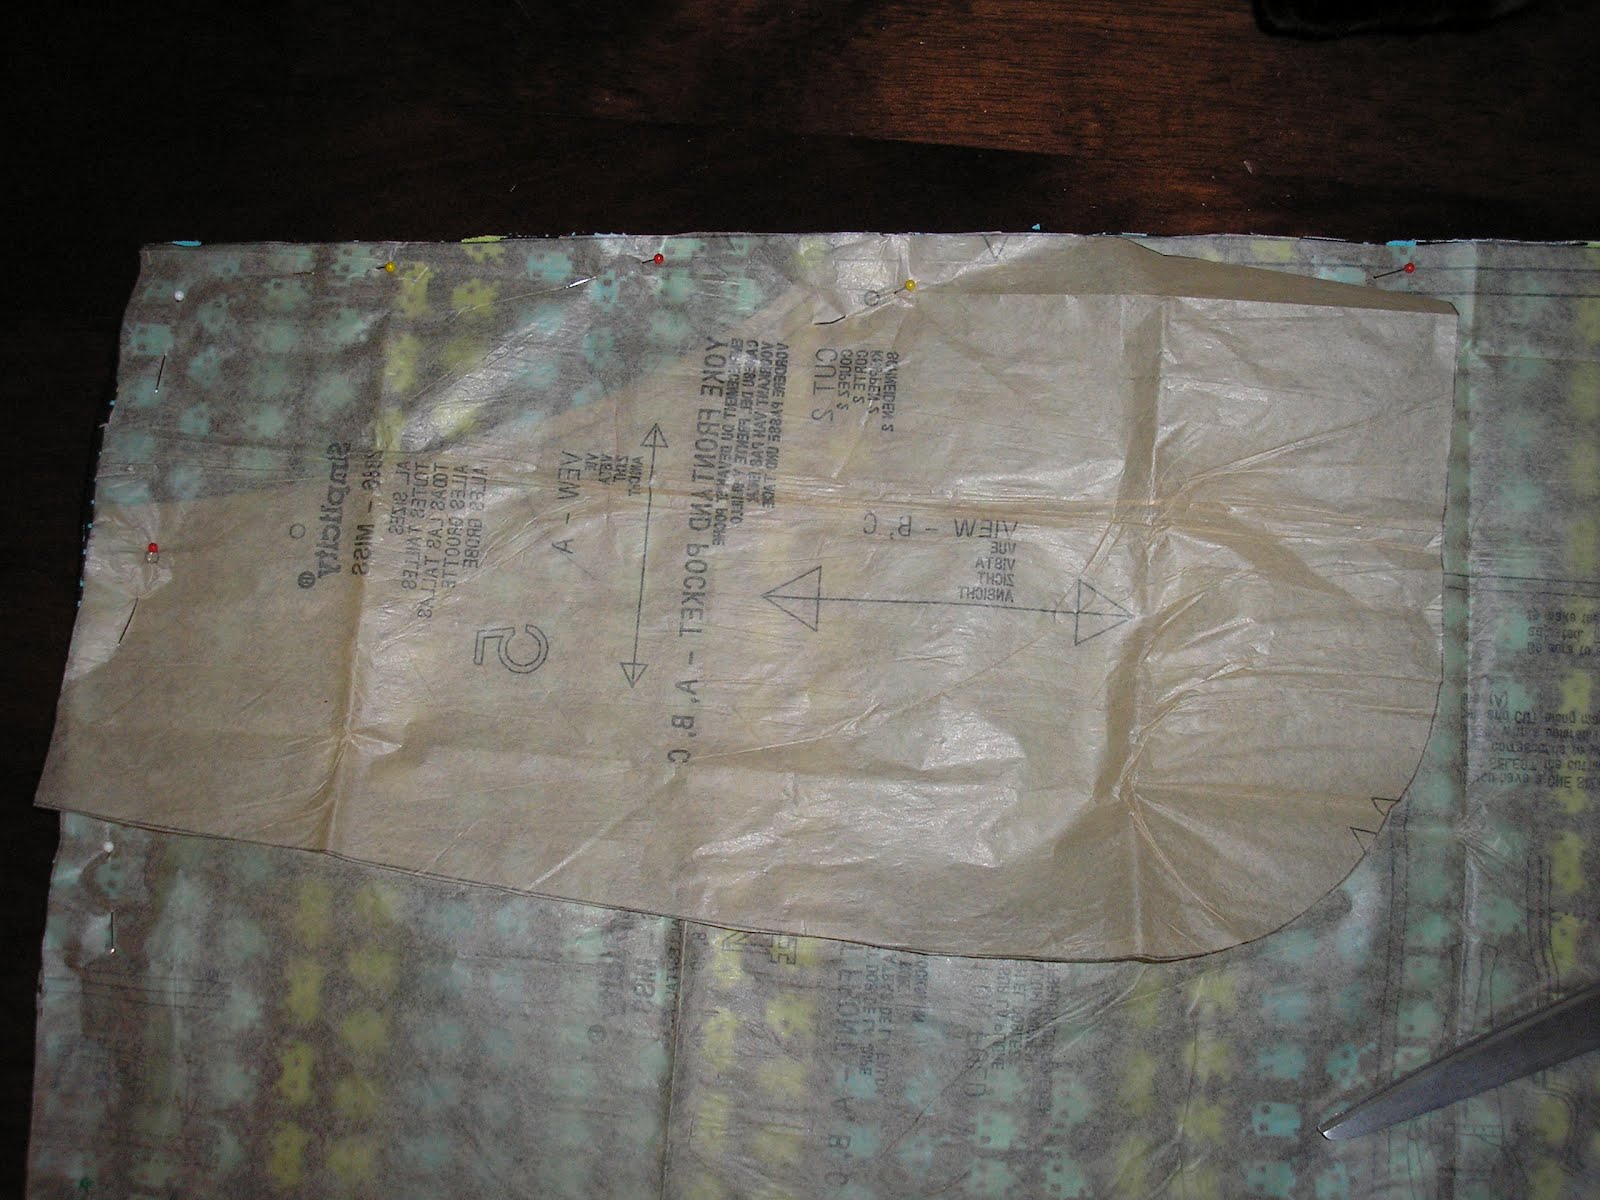
First off, if you plan on doing this repeatedly, it might be in your best interests to make a pattern. If you want to make a pattern, then you're going to need paper of some sort. Place likes JoAnn's sell actual pattern paper, but you can use newspaper, wax paper, plain old printer paper, or whatever. I used newspaper because I am frugal. Here's the pattern I made for my aforementioned friend:


You'll just want to slide it under the t shirt you're using as a pattern and trace it. Then add seam allowance (I used 1/2 inch on the sides and 1 inch at the bottom).
Very important: make sure the shirt you want to alter has been laundered as you plan to launder it in the future - in other words, if you usually wash your shirts in warm water and tumble dry them on low, then do that a few times before you alter it. To avoid fading and shrinkage, I usually wash my t shirts in cold water, inside out, and hang them up to dry. YMMV.
1) For the t shirt you're using as a pattern, fold it in half and pin. If it has side seams, line them up. Line up the shoulder and sleeve seams too. If it's wrinkly, you can try to press it flat with your hands, smoosh it under some books, wash it, or even (shudder) iron it. It doesn't have to be perfectly flat, but non-wrinkly is good.

2) For the t shirt you want to alter, fold it in half and pin. The same standards for wrinkliness apply here too.

3) Place the pattern shirt on top of the shirt to alter. Line them up at the top and on the folds. Pin. Don't worry about it if the sleeves don't match up.

4) If the shirts are the same length or you're okay with the length of shirt to alter, then don't worry about this step.
Otherwise, measure out one inch from the bottom of the pattern shirt and mark. I used pins, but you can use marking pencils or whatever method you like.

5) Measure out half an inch from the side seam and mark.

6) Cut very carefully along the marking lines. Be sure not to cut the pattern shirt.

7) When you get near the sleeve seam, carefully cut off your excess.

8) If you're happy with how the original sleeves fit or they're the same length/shape as the pattern shirt, skip this step.
Unpin the pattern shirt from the other shirt. Re-pin, aligning the sleeve seams. From the underarm, measure out half an inch and mark. From the opening, measure out one inch and mark. Cut again, carefully.

9) Unpin pattern shirt.

10) Unpin the shirt to be altered entirely and turn inside out. T shirt material tends to roll, so pin close to the edge along the side seams.

11) Sew in a half inch seam. I like to use a longer stitch because t shirts like to stretch. I zig zagged the edges to prevent ravelling.

12) If you aren't altering the length, you can skip the next few steps. Otherwise, fold up half an inch on the bottom.

13) Fold up again along the fold line. Sew close to the top fold with the same long stitch. You can sew along the bottom fold too, if you want.

14) If you aren't altering the sleeves, skip this step. Otherwise, fold up half an inch (as in length altering step), and then fold up again. To sew, turn the shirt right-side out and and sew close to the top fold. You can sew the bottom fold too, if you want.

15) You're done!

T shirts are harder to alter if you have to move the sleeves or you don't have a pattern shirt. I'll cover those in future lessons.
For this project, you will need:
-a t shirt you like the fit of
-a t shirt to alter
-straight pins
-scissors
-thread
Optional:
-marking pencils
-paper of some short
-pen, pencil, or a marker
-a Siamese cat that sits on everything you attempt to sew
First off, if you plan on doing this repeatedly, it might be in your best interests to make a pattern. If you want to make a pattern, then you're going to need paper of some sort. Place likes JoAnn's sell actual pattern paper, but you can use newspaper, wax paper, plain old printer paper, or whatever. I used newspaper because I am frugal. Here's the pattern I made for my aforementioned friend:


You'll just want to slide it under the t shirt you're using as a pattern and trace it. Then add seam allowance (I used 1/2 inch on the sides and 1 inch at the bottom).
Very important: make sure the shirt you want to alter has been laundered as you plan to launder it in the future - in other words, if you usually wash your shirts in warm water and tumble dry them on low, then do that a few times before you alter it. To avoid fading and shrinkage, I usually wash my t shirts in cold water, inside out, and hang them up to dry. YMMV.
1) For the t shirt you're using as a pattern, fold it in half and pin. If it has side seams, line them up. Line up the shoulder and sleeve seams too. If it's wrinkly, you can try to press it flat with your hands, smoosh it under some books, wash it, or even (shudder) iron it. It doesn't have to be perfectly flat, but non-wrinkly is good.

2) For the t shirt you want to alter, fold it in half and pin. The same standards for wrinkliness apply here too.

3) Place the pattern shirt on top of the shirt to alter. Line them up at the top and on the folds. Pin. Don't worry about it if the sleeves don't match up.

4) If the shirts are the same length or you're okay with the length of shirt to alter, then don't worry about this step.
Otherwise, measure out one inch from the bottom of the pattern shirt and mark. I used pins, but you can use marking pencils or whatever method you like.

5) Measure out half an inch from the side seam and mark.

6) Cut very carefully along the marking lines. Be sure not to cut the pattern shirt.

7) When you get near the sleeve seam, carefully cut off your excess.

8) If you're happy with how the original sleeves fit or they're the same length/shape as the pattern shirt, skip this step.
Unpin the pattern shirt from the other shirt. Re-pin, aligning the sleeve seams. From the underarm, measure out half an inch and mark. From the opening, measure out one inch and mark. Cut again, carefully.

9) Unpin pattern shirt.

10) Unpin the shirt to be altered entirely and turn inside out. T shirt material tends to roll, so pin close to the edge along the side seams.

11) Sew in a half inch seam. I like to use a longer stitch because t shirts like to stretch. I zig zagged the edges to prevent ravelling.

12) If you aren't altering the length, you can skip the next few steps. Otherwise, fold up half an inch on the bottom.

13) Fold up again along the fold line. Sew close to the top fold with the same long stitch. You can sew along the bottom fold too, if you want.

14) If you aren't altering the sleeves, skip this step. Otherwise, fold up half an inch (as in length altering step), and then fold up again. To sew, turn the shirt right-side out and and sew close to the top fold. You can sew the bottom fold too, if you want.

15) You're done!

T shirts are harder to alter if you have to move the sleeves or you don't have a pattern shirt. I'll cover those in future lessons.
Friday, March 2, 2012
Space Invaders II
And now back to our regularly scheduled programming.
As previously featured, I am making myself a Space Invaders dress out of this pattern. I am still not sure what to do for the contrast. I'm heading to JoAnn's this weekend to see what they've got for me. I'm sure I can find a solid to match the aqua or light blue, but I would still prefer a print. I guess we'll see.
In the meantime, I started on the non-contrast components of the dress. I didn't get too far with the actual sewing because the contrast comes in early, but I can at least show you what I've got so far.
First up: due to the various lengths and added contrasts of this pattern, there are several cutting lines on the dress' skirt.

Some people like to just cut out whichever pattern they're using at the time and will just buy the pattern again if they want a different view. I'm cut from a different cloth (ha, ha). I just pin where the cutting line on my view is and cut very carefully.
A common complaint I have about Simplicity and New Look patterns (owned by the same company) is that they are, shall we say, overly generous with their fabric allotments. This is after I pinned out the dress:

Look at that! Look at all the waste! I hate, hate, hate wasting fabric! This is so common with these pattern companies that I've gotten in the habit of not buying lining - there's usually enough leftover fabric. And there was more than enough this time:

Still a lot (not alot) left, but not so much that it makes me angry. Enough that I'll save it for some nerdy future project.
Next up is the modifications I made. You'll notice this pattern has skinny straps, which I dislike. I want the dress to be able to cover my bra straps! I just happened to have McCall's 5094 (I made a cute dress in view F last summer; perhaps I'll feature that at a later date), so I used the straps from D/E/F. These are the same width at the opening and closing as the original, but they curve out to be nice and fat. They're also a little shorter, which is good, because dress straps usually end up being too long on me.

Kitty approves.
I also skipped the pockets. Don't get me wrong - I dislike not having pockets to store my phone or keys in when I'm oot and aboot, but they never ever look good. It's not that I'm sewing them wrong or something - even in purchased dresses or skirts, they look weird, wrong, and they tend to bulge. And I've got big hips, so I don't need any more bulk in that area. So I suck it up, store my stuff in my purse, and my hips look as thin as they're ever going to look.

To omit the pockets, I just lined up the pocket against the skirt front, making sure the dots and the tailor's tacks lined up - et voila, pocket-less dress!
The last thing I did last night was pleating. I will gladly admit that while I'm a big fan of how pleats look, I am not the biggest fan of sewing them. And it doesn't help when the pattern is printed incorrectly.

You see the pleat line for size 6? Well, this is for sizes 6, 8, and 10, and there's no lines for sizes 8 & 10. I think this was just a misprint, as the front of the skirt just has a pleat line with no size marked. Harumph. I proceeded as if it was for all sizes, just like the front. Here's the back, after I sewed in the pleats:

So now I'm at a standstill until I get the contrast fabric. *grumble*
As previously featured, I am making myself a Space Invaders dress out of this pattern. I am still not sure what to do for the contrast. I'm heading to JoAnn's this weekend to see what they've got for me. I'm sure I can find a solid to match the aqua or light blue, but I would still prefer a print. I guess we'll see.
In the meantime, I started on the non-contrast components of the dress. I didn't get too far with the actual sewing because the contrast comes in early, but I can at least show you what I've got so far.
First up: due to the various lengths and added contrasts of this pattern, there are several cutting lines on the dress' skirt.

Some people like to just cut out whichever pattern they're using at the time and will just buy the pattern again if they want a different view. I'm cut from a different cloth (ha, ha). I just pin where the cutting line on my view is and cut very carefully.
A common complaint I have about Simplicity and New Look patterns (owned by the same company) is that they are, shall we say, overly generous with their fabric allotments. This is after I pinned out the dress:

Look at that! Look at all the waste! I hate, hate, hate wasting fabric! This is so common with these pattern companies that I've gotten in the habit of not buying lining - there's usually enough leftover fabric. And there was more than enough this time:

Still a lot (not alot) left, but not so much that it makes me angry. Enough that I'll save it for some nerdy future project.
Next up is the modifications I made. You'll notice this pattern has skinny straps, which I dislike. I want the dress to be able to cover my bra straps! I just happened to have McCall's 5094 (I made a cute dress in view F last summer; perhaps I'll feature that at a later date), so I used the straps from D/E/F. These are the same width at the opening and closing as the original, but they curve out to be nice and fat. They're also a little shorter, which is good, because dress straps usually end up being too long on me.

Kitty approves.
I also skipped the pockets. Don't get me wrong - I dislike not having pockets to store my phone or keys in when I'm oot and aboot, but they never ever look good. It's not that I'm sewing them wrong or something - even in purchased dresses or skirts, they look weird, wrong, and they tend to bulge. And I've got big hips, so I don't need any more bulk in that area. So I suck it up, store my stuff in my purse, and my hips look as thin as they're ever going to look.
To omit the pockets, I just lined up the pocket against the skirt front, making sure the dots and the tailor's tacks lined up - et voila, pocket-less dress!
The last thing I did last night was pleating. I will gladly admit that while I'm a big fan of how pleats look, I am not the biggest fan of sewing them. And it doesn't help when the pattern is printed incorrectly.

You see the pleat line for size 6? Well, this is for sizes 6, 8, and 10, and there's no lines for sizes 8 & 10. I think this was just a misprint, as the front of the skirt just has a pleat line with no size marked. Harumph. I proceeded as if it was for all sizes, just like the front. Here's the back, after I sewed in the pleats:

So now I'm at a standstill until I get the contrast fabric. *grumble*
Thursday, March 1, 2012
Grey? I Prefer "Pastel Black"
..And now for something completely different: a man with a tape recorder up his nose.
To participate in Sophistique Noir's monthly theme post (which is grey), I am going to feature pictures from my first pattern review (posted in the dark days of last week). And you in the back, I can hear you muttering "but you already posted those pictures!" Dear reader, I posted pictures of Azzurra, my sewing dummy, wearing the outfit. This post will feature me wearing the outfit, along with all the accouterments (except shoes).
Without further delay...


Other items featured:
Black tuxedo blouse (purchased at a thrift store for under $5)
Spider web tights by Leg Avenue (purchased from an online retailer - no idea which)
Pocketwatch (gift from hubby)
Spider necklace (probably from Claire's or Hot Topic)
Various spider earrings (the same)
I wore this with black pumps. Many thanks to hubby for taking the pictures.
Subscribe to:
Posts (Atom)