 
| Readers have likely surmised that I enjoy a good pun (and bad ones as well). I had it in the back of my head for a while to dress Theora as a catfish for Halloween. I found the idea utterly hilarious, though I knew she would hate it. Last year, I found the time to finally get around to the costume. The pattern here is Simplicity 3667. I used D, the dinosaur, but omitted the legs, cuffs, and spikes. I added fins and a sad looking tail (you can see it flopped to the side in the bottom picture). Theora is Siamese, which tend to be a smaller breed, so I used the smallest dog size (based on the spine measurement). I had to cut the leg holes bigger, but it was a pretty good fit. This was an easy costume; I knocked it out in an afternoon. The tiny little legs openings might present a bit of a challenge, but it's no more difficult than baby clothes. |
Showing posts with label kitty. Show all posts
Showing posts with label kitty. Show all posts
Monday, October 8, 2012
Catfishing for Compliments
Thursday, August 23, 2012
My JoAnn's Haul
 |
| Featuring Lydia's whiskers |
Now, I know that if I had waited a week or two, the price on all this would have been reduced 25%, but I COULD NOT WAIT. No, don't point out that I already have orange stripy socks (and several pairs of tights too), or that I wall clings are a pain in the ass. I DO NOT CARE. I must appease my Halloween needs.
Oops, I didn't buy notions for my costume today. I guess I'll have to return in a few days or weeks. :)
Sunday, August 19, 2012
My Michaels Haul II
As August and summer draw to a close, Halloween fast approaches. Stores are slowly, ever so slowly, displaying their Halloween merchandise. I previously mentioned my endeavors this year in locating spooky merchandise, so I guess this is the second in the series. Perhaps there will be more? They better not all be Michaels entries!
Onto this shopping experience, which is actually two. The first took place on Friday. I was invited to a birthday party. There was a gap between the end of my work day and the party, so I killed some time at JoAnn's (gotta buy fabric for my Halloween costume, of course!). It wasn't my local one, and was quite a bit smaller, so I didn't really know what to expect. Harvest/Thanksgiving decorations were displayed front and center, just as my local one the last time I was there. As I walked past the first aisle, the next was nearly empty. There were a few items at the end of the aisle, so a glimmer of hope blossomed in my dark little heart. I went over to inspect - a few Halloween decorations (nothing to my taste), and loads of candy! I grabbed some gum drops (I had been craving them all day, so I took it as a sign of fate), but nothing else. That they had anything out pleased me greatly. Sadly, their fabric selection was small and I only got one of three fabrics I need for my costume. I guess I will need to hit up my local one after all. I'll just give them a few days to put out their decorations. :)
The rest of my stops took place today. The hubby casually mentioned that a Spirit store was opening by Michaels. I figured it wouldn't hurt to stop in. I almost never buy anything in these places. It's usually of extremely poor quality, but I occasionally will buy decorative items or be inspired by their displays. Mostly, they just convince me than ever that I'm better off making my own costumes. Anyway, this one doesn't open until September, so I will save my judgment until then. However, I did notice on the way there that my local Hancock is closing. I guess the poor service I've always gotten there (except last the last time) finally did them in.
| So now, onto Michaels. Once again, they had so many fabulous items. I have a Halloween tree (a gift from one of my sisters-in-law) that I have never hung any decorations from. There were quite a few ornaments available. While I didn't buy any, I think they'd be fantastic. I'm waiting until later in the season so I can see what's for sale elsewhere. The first picture contains two cat collars and a skulls and bones bracelet. Yes, I am one of those horrible people who dresses their cats in costumes (incidentally, you'll see glimpses of them in the pictures - I guess they also have the Halloween bug). Last year, Theora was a catfish. I'll try to post a picture of it as we get closer to the season. The bracelet is going into my jewelry box, because yes, I am one of those people who wears cheap Halloween jewelry on non-Halloween days. The next picture features two hanging ghosts. There's nothing too special about them, but they were cheap and I thought they'd look nice hanging from the chandelier. Picture #3 is a set of haunted portraits (the kind that change from a normal picture to a skeleton, demon, etc). Obviously, hard to photograph, but I had to give it a shot. You kind kind of see the effect in the picture. Lydia is sneaking in a peek. The last two items are a hearse and what looks like a recipe box. I call it a recipe box because that's the sort of box (with the rounded lid) my parents and my mother's parents kept their recipes in. (My dad's mother seemed to keep all of hers in her head. She's still going strong at the age of 85.) I don't know if that's the actual term for it or not, but that's what I'm calling it. I planned on using this to store my trivia questions, as every party I host has a trivia contest. Theora is hanging out behind the hearse because she knows how awesome it is. Look, it even has a skeleton chauffeur! Even my husband likes it, and that's saying something. I immediately took this out of its box and put it on display. This puppy is going to be a year-round decoration. |

    |
Saturday, June 23, 2012
His & Hearse

  |
This is another It Came from My Closet! post, as I am attending a wedding this weekend and working on a project for someone else. It is no surprise that I, like most spooky types, dig hearses. I love them, quite frankly, and they hold a special place in my dark little heart. Ya see, when I met the now Mr Not Pixie, he drove a purple hearse. (I wish I could say it was love at first sight, but it wasn't. Not even close. But he grew on me.) Ever since I started sewing, I have been on the look out for hearse fabric. I had even pondered doing something like Spoonflower, but always shied away at the cost. Then two summers ago, Robert Kaufman released Eerie Alley. Not just purple hearses, but lime green and orange ones too! On white and black! (And another with pink hearses on black, which I, of course, made into a different blouse.) "It must be mine! Immediately!" It was a designer release, and a new one at that, so this didn't come cheap, but I didn't care. For purple hearses, I would pay, and pay gladly! And so I did. (Even a designer fabric is cheaper than Spoonflower.) New Look 6515 is so long out of print that it doesn't even appear on the Simplicity web site. (This link will take you Pattern Review's, um, pattern reviews for the, um, pattern.) I made view B, though my finished blouse doesn't really resemble theirs. It's a testament to how much I love this fabric that I was willing t put in so much work to get a wearable garment. First up: blouses like these, that lap one side over the other, rarely (in my experience) instruct you to stitch the bust pieces to each other somehow. I suppose that would work out just fine if you're the busty variety, but I most certainly am not; consequently, these always gap in the front. Though I am flat-chested, I am also broad-backed, which tends to even out, usually, in terms of ease. However, the amount of ease in both the front and back was ridiculous. I kept pulling the bust pieces closer and closer together, and omitting more and more gathering (so the cup itself would be smaller), but it finally got to the point where I had no gathering left and the pieces were lapped straight over one another. It fixed the gapping, but because there was no gathering, it ceased to be an empire-waist blouse. So I grabbed a piece of elastic and hand sewed it into the white band that you see at the front. Even after all of that, the ease was still so extreme that I look off a few inches of the back of the blouse too. Originally, this actually called for a zipper, but even now, I can still pull it on over my head with no problems. I can't imagine why you'd need a zipper with as much ease as the pattern originally called for. So, in conclusion, this pattern didn't really work for my body type. It might work for someone who has a full bust (but not too full, or you'll spill over the top). It wasn't difficult to sew, but it did require a lot of adjustments to get it me-sized. I did see a lot of other people complaining about the same problems I did, so maybe it wasn't just me Sorry, once again, for my wet hair. Please admire my floormat in the background. I usually move it out of the way for pictures, but forgot to this time. It decorates my foyer year-round (I have another at the back door as well). They were gifts from my sister-in-law, who seems to live out her spooky dreams vicariously through me. |
Lydia update: the day I write this marks four weeks of having this little grey terror live with us. She's put on 18 ounces (~.5 kg) in that time. The vet said she's doing well, though said with her feral start to life, she will probably have some delayed growth.
Outfit:
Skirt: Wet Seal, free at a clothing swap
Shoes: Famous Footwear, $70 (featured on Green with Envy)
Socks: from the same pack of vibrant colors featured on Green with Envy
Earrings: Hearses and coffins were charms I bought on Etsy and attached to fishhooks; skull earrings from eBay (featured on Skull Skirt)
I have a coffin necklace (made from the same charms as the earrings) that I usually wear with this, but couldn't find it this morning. I was so distraught that I forgot my awesome purple hearse barrettes too. :( Not all bad though - at work, a guy in a suit that I'd never seen before, told me he liked how my purple socks, hair, and hearses coordinated together. :)
Thursday, June 14, 2012
Gimme! NOW!
Three things, in order of decreasing importance.
- Mr Macabre has informed me of the existence of Disney's Haunted Mansion wallpaper fabric. Expensive, but so worth it. Buy it now, before Disney slaps them with a cease and desist order!
Kind of makes me upset that I already started making this fabric using paint and a stencil, but I'm sure this would turn out better than I could ever do it. - The blog reached 1000 hits today! I know, some blogs get that many hits in a day, but for something as niche as spooky-nerdy sewing, I am pretty impressed with myself. I would like to do some kind of contest or giveaway to show my appreciation to my readers, but you'll have to tell me what you'd like as a prize. I know not everyone who reads the blog sews, so something like fabric or a pattern wouldn't appeal to all. So, please let me know what you'd like to see as a prize, or any suggestions on how to run the contest (as I have never done this before).
- It is quite difficult to blog with Lydia in my lap.
Sunday, June 3, 2012
Skull Skirt
Hello everyone and welcome to visitors from Sophistique Noir! I wanted to kick off Red & Black week with something fun and spooky, so I decided I must sew something out of this fabric:
 Allow me to present Midnight Madness by Northcott. I'm not really sure why I bought this fabric (other than, ya know, it's super cool). I didn't have any particular garment in mind, and I really do have plenty of skull fabric already, but I guess I just couldn't resist. For those curious, it came from my favorite fabric site, Fabric.com, but they no longer carry it.
 I only bought two yards, so I was a bit limited in what I could make. I
don't have all that many long, full skirts, so I figured that would be
good. It would be simple enough to halve two yards of fabric, sew them
together, make a casing, and insert elastic, but I'm not all that fond
of elastic waists (except in PJs). Rather than try to find a pattern
for something so simple, I just grabbed the waistband from a different
skirt. Readers may recognize Simplicity 9825 from my first pattern review.
I only bought two yards, so I was a bit limited in what I could make. I
don't have all that many long, full skirts, so I figured that would be
good. It would be simple enough to halve two yards of fabric, sew them
together, make a casing, and insert elastic, but I'm not all that fond
of elastic waists (except in PJs). Rather than try to find a pattern
for something so simple, I just grabbed the waistband from a different
skirt. Readers may recognize Simplicity 9825 from my first pattern review.
That pattern actually zips up the back, and since I wanted to gather the fabric, I moved the zipper to the left side. Readers may also remember that I almost did that, quite by accident, the first time through.

The next step was gathering the fabric. I halved the fabric after I cut the waistband and then sewed it together. To gather, I just used a long stitch and pulled the ends. A gathering foot would also have worked here, but I don't have one.
 The pattern calls for the facing to be hand-sewn in place after sewing
the skirt to the waistband. I just didn't feel like it at the time, so I
top-stitched it. I figured since the stitching would show anyway, I
might as well do it in a contrasting color, and in spirit of the theme, I
chose red. And since I'd done the bottom, I figured I'd do the top too.
The pattern calls for the facing to be hand-sewn in place after sewing
the skirt to the waistband. I just didn't feel like it at the time, so I
top-stitched it. I figured since the stitching would show anyway, I
might as well do it in a contrasting color, and in spirit of the theme, I
chose red. And since I'd done the bottom, I figured I'd do the top too.
 And I might as well do the hem!
 This only took about two hours. I knocked it off on a weekend in between breakfast and my morning run. And that time includes several doctor-prescribed kitty-petting breaks.


 From the back, tucked, and the side, untucked. My hair is wet, sorry.
 And with my favorite new accessory, Lydia. She was feral, and abandoned by her mother when she was only two weeks old. A cat rescue found her and took care of her until she was old enough to be adopted. The poor girl has some serious abandonment issues, but despite her rough start to life, she's sweet and cuddly. This one wasn't too pleased at first, but seems to have accepted Lydia as a minion in her evil kitty army.
What I'm wearing:
Plain black girly-fit t-shirt: JoAnn's, ~$5
Sandals: Famous Footwear, ~$30
Metal skull bracelet: Spencer's, $7 (probably the first spooky accessory I ever purchased)
Plastic skull bracelet: Some gas station in the Outer Banks, ~$2
Skull earrings: the top and bottom pair are probably from Hot Topic, ~$5; the middle pair is from eBay, ~$2 (I bought them so long ago that the archives don't go back that far)
Skull barrettes: pretty sure these came from Claire's, ~$5
Thanks for reading and stay tuned! I have posts planned for every day of this event!


That pattern actually zips up the back, and since I wanted to gather the fabric, I moved the zipper to the left side. Readers may also remember that I almost did that, quite by accident, the first time through.

The next step was gathering the fabric. I halved the fabric after I cut the waistband and then sewed it together. To gather, I just used a long stitch and pulled the ends. A gathering foot would also have worked here, but I don't have one.


I'm not sure if I prefer this with the shirt tucked or untucked. I really balk at tucking in my shirts most of the time. I know it tends to look sloppy, but they never stay tucked and sometimes look silly. I think the untucked version gives more shape to the outfit.


What I'm wearing:
Plain black girly-fit t-shirt: JoAnn's, ~$5
Sandals: Famous Footwear, ~$30
Metal skull bracelet: Spencer's, $7 (probably the first spooky accessory I ever purchased)
Plastic skull bracelet: Some gas station in the Outer Banks, ~$2
Skull earrings: the top and bottom pair are probably from Hot Topic, ~$5; the middle pair is from eBay, ~$2 (I bought them so long ago that the archives don't go back that far)
Skull barrettes: pretty sure these came from Claire's, ~$5
Thanks for reading and stay tuned! I have posts planned for every day of this event!
Tuesday, March 27, 2012
Skittles Dress II
Last time, I left you lamenting over how I couldn't eat Skittles (I checked - the recipe has changed and Skittles no longer uses gelatin, though Starburst still does) and with a convoluted tale of how I chose the fabric for Butterick 4790. I stated, off-handedly, that the sewing of the dress would probably end up being shorter. Oh boy, when will I learn not to open my big mouth?
First up: since I was making the dress in view A, I needed a fabric for contrast. Plain black wouldn't have worked here, I thought. It seemed too stark. I did have a matching pink (JoAnn's calls it flamingo), leftover from a Daisy-Head Maizy costume I made for a coworker. Apparently it makes a comfy cat bed.

Butterick rates this pattern as "very easy". Erm. I would say it's "very easy" for someone who already knows how to sew. The first step is inserting darts in the front and back, with no instructions other than "sew in darts". This is the front:

I've seen fewer lines on a road map. Note that the lower dart actually meets up with the bust dart! Sure, since I can put in darts with my eyes closed, this wasn't a big deal to me, but this alone would probably bump a pattern from the "very easy" category. Harumph #1.
Because the skirt of the dress is cut on the bias, this dress has to hang a while to stretch out. The instructions say 24 hours, which I found weird. Usually they say overnight or eight hours, but whatever. This style of is called a walkaway dress because you can sew it quickly in the morning and walk away wearing it that night. Doesn't seem possible if you have to hang it for 24 hours.
The next few steps involve putting darts in the back, joining the back and front, and then hemming the skirt. If you can handle the darts from the first step, this should be no problem. However, the next step involves bias tape. I won't treat you to my rant on bias tape, but I will suffice it to say that I made my own (as I always do) out of the leftover fabric from the front. The instructions at this point are "enclose the seam in bias tape" - er, what? Again, I am experienced at this, but for "very easy" I would have expected more. I have several Simplicity patterns of a higher difficulty rating that feature step by step instructions on using bias tape. Harumph #2.

After the bias tape is applied, sewing on the closure is the final step. The pattern states to use sew-on snaps (overlapping the front) and then make a loop for buttons out of bias tape. I did not like the look of the overlapping front. It added bulk to the waist and just looked sloppy. Also, I don't trust stretchy bias tape with two buttons to keep a dress closed. I decided I would have the bias taped edges just meet in the middle and use actual buttons with buttonholes for the closure. I toyed with sewing a flap to the inside edge, sewing buttons to that, and flipping it over (does that make sense to anyone but me?), but in the end, I sewed the buttons to the actual inner front (the pink part) and the buttonholes in the outer dotty fabric. That should also ensure that the dress doesn't slip around too much.

The color combination reminds me of watermelon. I flipped the front around, buttoned it, and then added a hook and eye to ensure the dress doesn't pull too much at the buttonholes.


Here's the back and side:


Looks cute, right? I showed it to my husband and he said "wow, that's a lot of pink!" This from a guy who is always trying to get me to wear more color (to which I say: "I wear exactly as much color as I want to"). This was immediately followed with "hey, your bra is showing through!" - I guess I'm either going to have to get a beige color bra (ugh), line the dress (ugh ugh), or wear a slip (ugh ugh ugh). Harumph #3 (though this one is my fault).
I twirled around a little to make sure the fit was good and immediately noticed a problem. Scroll up to the picture of just the front with the buttons; the back of the sheath isn't sewn to itself or anything, and the only thing keeping the back of the dress in place is static cling. When I wore it, the sides immediately fell down to the level of the buttons, exposing my bra and ribs. A quick fix was a small piece of elastic and some Velcro, but sheesh. This dress would be utterly unwearable if it was constructed according to the directions.
So, it comes down to this: though Butterick might rate this pattern "very easy", if you don't already know how to sew in darts and enclose seams in bias tape, I would shy away from this one if you're just starting. If you're not comfortable with making major modifications to make a garment wearable, steer clear. Simplicity has a better collection of learning to sew patterns.
One more thing, regarding the waist: since this is going to be tight around your waist, double check your measurements! I saw a lot of people whining about how there must be something wrong with the pattern to gap or overlap in the front so - nope, you either sewed it wrong, cut the incorrect size, or you aren't the size you think you are. A lot of people measure once and then don't bother doing it again after significant weight loss or gain, and then bemoan how sizing on their patterns are wrong. Listen, if your purchased garments don't fit after weight change, why would sewn garments? Harumph #4.
Monday, March 12, 2012
Space Invaders III
If you haven't already, you might want to read parts I and II.
The last update on this dress had me considering my contrast options. If you recall, I was pretty confident that I could find a solid aqua or light blue to match the Space Invaders, but had my heart set on some kind of print. My first stop was JoAnn's. Let me first say that I'm not angry, I'm just disappointed. Despite the huge wall of quilting cotton that my local JoAnn's has, they had only one print that even came close to matching - but it was swirly, busy, and just didn't go with the blocky Invaders. So I gave up on that idea and decided I'd just go with a solid. Not my first choice, but eh, no biggie. Well, again, despite the huge selection of quilting cotton, I only found one color match. To refresh your memory, this is what the fabric looks like:
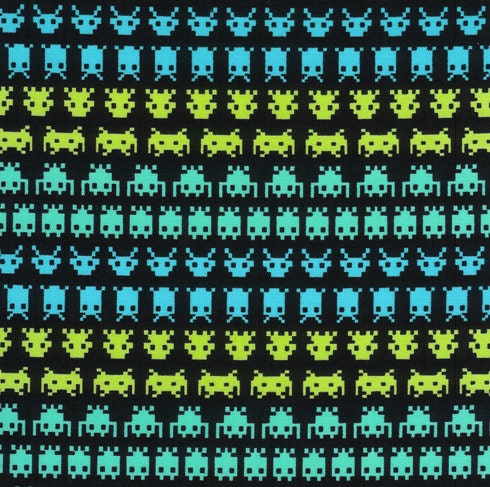
I would have been fine with either aqua or blue, but the only match was in that nasty yellow-green. With no other options, I purchased a minty green - it was in the same color family, but not as dark. I was pretty upset by that I couldn't find anything better - so upset that I went to Hancock's. I really dislike going to my local Hancock's. It's a pretty long story, but I'll just say that it involves rudeness and bad smells. But I figured that for Space Invaders, I could stand it. Their selection was even worse! Nothing even came close. I stared forlornly at the quilting cotton before admitting defeat and heading home.
At that point, my options were to go with the minty green or buy online. Matching colors online is tough without fabric swatches and I didn't really want to waste the time on that. I reluctantly settled on the minty green. The dress is lined and interfaced, so at least I wouldn't have to be concerned about my bra straps showing through.
As of my last update, I had sewn together most of the skirt and part of the top - that was as far as I could get before the contrast came in. Here was the first step in that process:

As you can see, the mint isn't a perfect color match. I grumbled every step of the way about how I was wasting this precious Space Invaders fabric (I'm just gonna say "SI" from now on, okay?), not to mention my precious weekend. Nevertheless, I plunged ahead because I don't like leaving projects unfinished.
My first challenge was the midriff section. The instructions said "sew broken lines together". That's it. It wouldn't have been so bad if there were only two lines, but this is the pattern piece:

I can think of any number of ways one could "sew broken lines together", and even tried experimenting on some scraps, but they all left me with a diminutive midriff piece that was far smaller than the lining piece. It took me longer than I care to admit before I figured out exactly what the instructions were telling me to do. You see where it says "tuck" up there? You sew the lines immediately above and below together, and they don't get sewn to anything else. That does leave an extra line at the top and bottom though, which is why I think I got confused. Those lines are never mentioned, so I think they represent the stitching lines for where the skirt and bodice are attached.
This is the piece pinned:

And here it is sewn:

Sewn to the bodice:

I proceeded with the rest of the pattern, which involved attaching the back, sewing on the skirt, adding the contrast band, and sewing in the zipper. This dress is a bit unusual in that the back is fitted with elastic and the zipper is on the left side (if you're a leftie making this, you might want to move it to the other side). Here's the final dress:


This is how a kitty sulks after you've shooed her off your dress one too many times:

So, overall, this pattern wasn't too difficult, but it was pretty time consuming. Part of the reason for this is that the instructions were very dense - four full pages, not counting the Spanish section. I understand the company has to pay more to get another page of instructions, but "sew broken lines together" is somewhat lacking in clarity. On top of that, I spotted a couple of typos in the instructions and the previously mentioned misprint on the pattern itself. The technical challenges here include: pleating, tucking, gathering, inserting a zipper, and inserting elastic. The last two aren't too bad, but the first three can be. For these reasons, I would recommend this pattern for those of intermediate sewing skills. If Simplicity can correct their typos and expand the instructions, an advanced beginner could probably handle this.
If I made this again, I would make the changes I did before (straps and pockets), but I would also change how the bodice is constructed. I didn't like that it left raw exposed seams. I finished mine, but it wouldn't have been to hard to turn them inside. It grieves me a little to know they're there. :( Also, I was a little disappointed in the length - it hits me about mid-knee, which is a little shorter than I'd like. My fault for not checking the length beforehand, but I would probably lengthen this by two inches, at least. Double check your lengths!
The last update on this dress had me considering my contrast options. If you recall, I was pretty confident that I could find a solid aqua or light blue to match the Space Invaders, but had my heart set on some kind of print. My first stop was JoAnn's. Let me first say that I'm not angry, I'm just disappointed. Despite the huge wall of quilting cotton that my local JoAnn's has, they had only one print that even came close to matching - but it was swirly, busy, and just didn't go with the blocky Invaders. So I gave up on that idea and decided I'd just go with a solid. Not my first choice, but eh, no biggie. Well, again, despite the huge selection of quilting cotton, I only found one color match. To refresh your memory, this is what the fabric looks like:
I would have been fine with either aqua or blue, but the only match was in that nasty yellow-green. With no other options, I purchased a minty green - it was in the same color family, but not as dark. I was pretty upset by that I couldn't find anything better - so upset that I went to Hancock's. I really dislike going to my local Hancock's. It's a pretty long story, but I'll just say that it involves rudeness and bad smells. But I figured that for Space Invaders, I could stand it. Their selection was even worse! Nothing even came close. I stared forlornly at the quilting cotton before admitting defeat and heading home.
At that point, my options were to go with the minty green or buy online. Matching colors online is tough without fabric swatches and I didn't really want to waste the time on that. I reluctantly settled on the minty green. The dress is lined and interfaced, so at least I wouldn't have to be concerned about my bra straps showing through.
As of my last update, I had sewn together most of the skirt and part of the top - that was as far as I could get before the contrast came in. Here was the first step in that process:

As you can see, the mint isn't a perfect color match. I grumbled every step of the way about how I was wasting this precious Space Invaders fabric (I'm just gonna say "SI" from now on, okay?), not to mention my precious weekend. Nevertheless, I plunged ahead because I don't like leaving projects unfinished.
My first challenge was the midriff section. The instructions said "sew broken lines together". That's it. It wouldn't have been so bad if there were only two lines, but this is the pattern piece:

I can think of any number of ways one could "sew broken lines together", and even tried experimenting on some scraps, but they all left me with a diminutive midriff piece that was far smaller than the lining piece. It took me longer than I care to admit before I figured out exactly what the instructions were telling me to do. You see where it says "tuck" up there? You sew the lines immediately above and below together, and they don't get sewn to anything else. That does leave an extra line at the top and bottom though, which is why I think I got confused. Those lines are never mentioned, so I think they represent the stitching lines for where the skirt and bodice are attached.
This is the piece pinned:

And here it is sewn:

Sewn to the bodice:

I proceeded with the rest of the pattern, which involved attaching the back, sewing on the skirt, adding the contrast band, and sewing in the zipper. This dress is a bit unusual in that the back is fitted with elastic and the zipper is on the left side (if you're a leftie making this, you might want to move it to the other side). Here's the final dress:


This is how a kitty sulks after you've shooed her off your dress one too many times:

So, overall, this pattern wasn't too difficult, but it was pretty time consuming. Part of the reason for this is that the instructions were very dense - four full pages, not counting the Spanish section. I understand the company has to pay more to get another page of instructions, but "sew broken lines together" is somewhat lacking in clarity. On top of that, I spotted a couple of typos in the instructions and the previously mentioned misprint on the pattern itself. The technical challenges here include: pleating, tucking, gathering, inserting a zipper, and inserting elastic. The last two aren't too bad, but the first three can be. For these reasons, I would recommend this pattern for those of intermediate sewing skills. If Simplicity can correct their typos and expand the instructions, an advanced beginner could probably handle this.
If I made this again, I would make the changes I did before (straps and pockets), but I would also change how the bodice is constructed. I didn't like that it left raw exposed seams. I finished mine, but it wouldn't have been to hard to turn them inside. It grieves me a little to know they're there. :( Also, I was a little disappointed in the length - it hits me about mid-knee, which is a little shorter than I'd like. My fault for not checking the length beforehand, but I would probably lengthen this by two inches, at least. Double check your lengths!
Subscribe to:
Posts (Atom)